Tally T6140 & T6141 Line Printer - Parts & Supplies
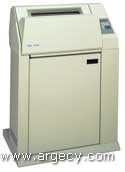 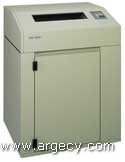 Tally T6140/T6141 |
Outstanding performance
The T6140 offers dramatic printing performance of 1420 lines per minute, and a massive 250,000 page per month workload. A graphics print speed of 180 inches per minute makes it the graphics specialist of the Tally Line printer range, and perhaps the fastest impact barcode printer in the world.
Advanced fully featured controller
What sets Tally Line printers apart from others is the fully featured controller provided as standard. With more emulations, fonts and barcodes as standard than any competitor, plus advanced graphics processing languages including PGL and Code V, these printers more versatile and capable. Tally's advanced "Page Segmentation Architecture", coupled with the RISC processor ensures that even the most complex data stream is printed at maximum speed.
Flexible connectivity
In addition to the inclusion of all the industry standard emulations, the T6140 and T6141 offer a series of interfaces for connection to a wide range of host systems. Serial and Bi-directional Parallel, IBM Twinax and Coax as well as LAN interfaces are all either as standard or optional features.
Fail-safe paper handling
Four tractors, dual high torque motors and a straight paper path ensure that even the heaviest 6-part media is handled effectively, even at the maximum paper movement speed of 20 inches per second.
Advanced features
Dual print modes provide constant and enhanced density print modes offering richer, sharper and clearer print in a wider range of font styles. Our "Read/Right Algorithym" ingeniously prints denser and more readable barcodes ensuring that the first pass read result is second to none.
| Print Technology | Line impact dot matrix | ||||
| Print Speed | Text: 1420 lines per minute (max.) Graphics: 180 inches per minute (max.) | ||||
| Workload | 250,000 pages per month | ||||
| Acoustic Level | T6140: 55 dB(A) T6141: 52 dB(A) | ||||
| Character Printing Modes | Constant density fonts, enhanced fonts | ||||
| Character Sets | 27 unique character sets with 35 language substitutions | ||||
| Characters Per Inch | 5, 6, 6.7, 7.5, 8.3, 8.6, 10, 12, 13.3, 15, 16.7, 17.1, 20 cpi | ||||
| Lines Per Inch | 1.5, 2, 3, 4, 5, 6, 8, 9, 10 & 12 (plus variable line spacing) | ||||
| Fonts | Draft, Data Processing, Courier, Gothic, OCR A & B | ||||
| Character Styles | Bold, italic, double width, superscript, subscript, double height, underline, proportional spacing, auto centered, overline, strikethrough and right justified | ||||
| Graphics Resolution | Maximum: 240 x 288 dots per inch maximum | ||||
| Graphics Compatibility | Tally Industrial Graphics; QMS CODE VTMVersion 2; Printronix PGL | ||||
| Bar Codes | Code 39, Code 128, Interleaved 2 of 5, UPC-A, UPC-E, EAN 8, EAN 13, EAN 128, Codabar, Identicon 2 of 5, MSI, POSTNET | ||||
| Control Panel | Alphanumeric display (six languages) provides complete access to printer operation, configuration, calibration and test features. Includes lockout feature | ||||
| Paper Handling Features | Straight paper path, four tractor system, passive paper stacker, paper motion detector and alarm, paper tension control, forms position retained in non-volatile memory | ||||
| Print Media | Up to 6-part forms, forms thickness max: .025", weight: 15 - 100 lb. stock | ||||
| Paper Sizes | Width: 2.5" - 16.25", forms length: 1 - 255 lines (max. length 12" for T6141 with door closed) | ||||
| Paper Advance | Slew speed: 20 inches per second (max.) | ||||
| Standard Interfaces | Serial and Parallel (both ports hot, and active port selected automatically) | ||||
| Standard Emulations | MTPL, Printronix P600 and P6000, HP 2564C, DEC LG01, Epson FX100, Genicom ANSI & IBM Proprinter III XL | ||||
| Ribbon | Easy-load, clean-hands cartridges 25, 50 and 150 million characters | ||||
| Physical (H x W x D) | T6140: Quietized = 44" (closed) 61" (open) 31.63" x 34.5"; 164 lbs. T6141: 42" x 32" x 28"; 265 lbs. | ||||
| Power Requirements | 110 - 240 VAC, 50/60 Hz (auto-ranging) | ||||
| Environmental |
| ||||
| Optional Interfaces | IBM Systems Interface Option (SIO): Twinax or Coax and Parallel. Ethernet Interface Option (EIO): Novell Netware or TCP/IP and Parallel |
Buffer Overflow
If your printer displays the message "Buffer Overflow" in the Control Panel Display, you are most likely using the serial interface with Xon-Xoff protocol. This being the case, you need to make some particular settings in the serial interface parameters which are detailed in a technical note
Performing A Hex Dump
Switch the printer on and set to Offline and follow these instructions.
Press the Mode key: display will show Offline Normal.
Press any Arrow key until display shows Offline Config.
Press the Forms/1 key.
Press any Arrow key until display shows Config Printer.
Press the CPI/2 key.
Press any Arrow key until display shows Printer Dump Mode.
Press the LPI/3 key.
Press any Arrow key until display shows Dump Mode Style 1.
Press the Enter key and place printer Online.
Send Data to printer and data will be printed in hex format.
To return the printer to normal operation, either follow the above instructions, setting Dump Mode to Off or power cycle the printer.
Restoring Factory Defaults In The Printer
To restore the factory defaults within the printer, follow these instructions.
Press the Mode key: display will show Offline Normal.
Press any Arrow key until display shows Offline Config.
Press the Forms/1 key.
Press any Arrow key until display shows Config Printer.
Press the CPI/2 key.
Press any Arrow key until display shows Printer Load.
Press the LPI/3 key.
Press any Arrow key until display shows Load Default.
Press the Enter key and place printer Online.
Your printer is now set to the factory default configuration.
Printing the Current Printer Configurations
To print the current printer configurations, follow these instructions.
Press the Mode key: display will show Offline Normal.
Press any Arrow key until display shows Offline Config.
Press the Forms/1 key.
Press any Arrow key until display shows Config Printer.
Press the CPI/2 key.
Press any Arrow key until display shows Printer Report.
Press the LPI/3 key.
Press any Arrow key until display shows Report Configs.
Press the Enter key and the configurations will be printed.
Printer Firmware Version
To discover the printer firmware version print the Current Printer Configurations (see above) and look for the Main CPU Software version near the top of the printout.
Connecting Printer To AS400
If you have a standard printer then the AS400 computers will not have a printer configuration for the Tally printers so if you are wanting a configuration for the printer, we recommend that you select the configuration for the Epson FX. You will also need to set the printer into the Epson emulation.
Setting Top Of Form
To set the Top Of Form (TOF) follow these instructions:
Load paper into the top and bottom tractors.
Use the Arrow keys to move the paper until the position where you require the top row of dots to be is adjacent to the small "pip" on the top tractor covers. Then press the TOF key on the control panel. This will cause the paper to move down and be positioned at Top Of Form.
Locking and Unlocking the Control Panel
To Lock or Unlock the Control Panel, follow these instructions:
Set the printer to Offline.
Press the Enter and LF keys together for approx 3 - 4 seconds. The alarm will sound. (Tech Access On)
Press the Enter and CPI keys together for approx 3 - 4 seconds. The alarm will sound. (Panel Lock toggled)
Press the Enter and LF keys together for approx 3 - 4 seconds. The alarm will sound. (Tech Access Off)
Printing Via External Print Server
These printers are not reliable if connected to external print servers unless the printer parallel interface has been set Uni-Directional. To do this, you need to follow these instructions.
Set the printer to Offline.
Press the Enter and LF keys together for approx 3 - 4 seconds. The alarm will sound. (Tech Access On)
Press the Mode key: display will show Offline Normal.
Press any Arrow key until display shows Offline Config.
Press the Forms/1 key.
Press any Arrow key until display shows Config Paralel.
Press the CPI/2 key.
Press any Arrow key until display shows Paralel Bi-Dir.
Press the LPI/3 key.
Press any Arrow key until display shows Bi-Dir Off.
Press the Enter key and the interface will be set.
Press the Clear key.
Press the Enter and LF keys together for approx 3 - 4 seconds. The alarm will sound. (Tech Access Off)
On the external Print Server, you need to ensure that the unit is also set for uni-directional working.
Tally line printers are able to work with systems using the serial RS232 interface running the Xon-Xoff protocol but there are certain parameters within the printer that need to be changed to enable this to function correctly.
The following table shows the pertinent Serial Interface Parameters, their default values and the values that they should be set to for correct working with Xon-Xoff protocol.
| Parameter | Default | Change to |
| Baud | 9600 | User Defined |
| # Bits | 8 | User Defined |
| # Stops | 1 | User Defined |
| Parity | None | User Defined |
| 8thBit | Data | User Defined |
| Protocl | Rdy Bsy | Xon-Xoff |
| Sts Enq | OFF | OFF |
| DTR | Busy | Power |
| DTR Pol | Actv Lo | Act Hi |
| RTS | Busy | n/a |
| RB Xon | OFF | n/a |